Thursday, December 31, 2015

Happy New Year from the Time Bandits and me!

Oh my goodness, where did December go?  I had so many wonderful creative ideas that never quite made it to reality this month and for the first time in I don't know how long, I BOUGHT Christmas cards... Scary stuff!!  I did manage to squeeze in a Cookie Day with my mom and sister, and we managed to do our shopping and wrapping without being too rushed, but there was quite a bit that I would have liked to accomplish.  I have an entire pinterest board full of treats and candies that I wanted to make, and of course all of the cards that I really wanted to create, but somehow they were moved to the back burner while I did everything else.  So today, New Years eve, I found myself with a little free time and decided to make some cards-18 to be exact!

I needed some thank you cards for the gifts I received from school, and really wanted to make them, so I decided to try out a design I had pinned earlier this month.  Unfortunately, the video link with directions was no longer available.  I did manage to create a good guess of how it was done.  The 'big idea' behind these cards is to use a 12x12 piece of pattern paper, some ribbon, a stamp, and cardstock to create some super quick cards.  I didn't have the original dimensions, but quickly figured out that if I cut my paper into 4" strips vertically, and then cut 3" strips horizontally, I could make it work.Three of my 3x4 squares were then cut to 1x4.  I hope the instructions make sense when you look at the cards.  If not, please feel free to message me for a better tutorial.

The green strip is the reverse of the bottom paper and I 
used the ribbon to hide the seams of the papers.

Same idea for this one, only I didn't add the 1 1/4"
cardstock for the sentiment. I simply stamped on the base.

Now, not only are my thank you notes finished, but I also have 9 Christmas cards added to the box for next year.  Did I mention that it really bummed me out to use store bought cards this year???

Those of you who visit my blog frequently know that I am not a fan of new years resolutions, so instead of a list of resolutions I will leave you with a quote and wishes for a peace filled new year!

Life should be a continual celebration,
a festival of lights, the whole year around.
Only then you can grow up, you can blossom.
Transform small things into celebration.
-Osho

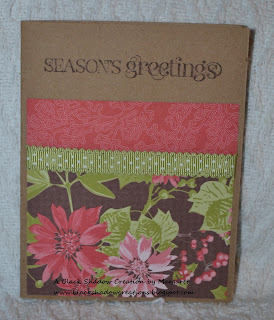
Card Recipes: Paper-Holiday Treasures and Holly Berry Bouquet DSPs, very vanilla, kraft, Ink-chocolate chip, Accessories-old olive scallop dots and chocolate chip grosgrain ribbon

Thursday, November 26, 2015

Happy Thanksgiving and ornament time

Hello! I am barely squeezing this post in to wish my US friends a happy Thanksgiving!  We have eaten our fill and I had a few minutes before retiring for the evening and wanted to share a little something crafty.

Every year, my mom and her sisters get the families together for a Thanksgiving dinner.  It tends to resemble a reunion more than Thanksgiving, but we always have a wonderful time together.  There is also an annual ornament swap that happens after the meal.  Anyone wanting to participate brings an ornament or two and then they swap 'sneaky Santa' style.  My girls starting making their own ornaments for the swap several years ago and while there was quite a bit of help from Mom in the beginning years, DD#1 has managed to make her own with only a bit of suggestion from me this year.  Here are her ornaments...


She used the Season of Cheer dsp and started with a punched circle (you can't see it in the photos, but it's the base) and used 2x2 squares rolled into cones to go around the circle.  Then she used the Rosette die to make the rosette you see in the center.  A button with the shank cut off was added to the center to finish it off.

I will try to share DD#2s ornament soon.  I didn't get a photo of it before it was given away, but she is making a few more for gifts, so I will get a picture when they are completed.

I hope you have enjoyed my crafty girl's ornaments and want to wish you the happiest of Thanksgivings.  Our family has been so blessed this year.  Even when we were dealing with difficult decisions and saying goodbye to loved ones, there was always something or someone reminding us that we have so much to be thankful for and that tough times don't last forever. It has reminded me that the little everyday things are what really matters in the end and hopefully this will keep me on the right track as we prepare for Christmas.  I'm going to try to be more focused on the purpose of my actions and gifts instead of stressing over what I think I need to get completed before the big day arrives.

Thanks so much for stopping by and I look forward to sharing more creativity with you in the future!

Monday, November 9, 2015

Early Christmas Cards

Well, hello! It has been so long since I've posted, I almost forgot how!!  I am finally getting around to making a few more Christmas cards.  We won't discuss how many more I need to make before I'm finished...  We'll just focus on the fact that as of right now, I'm ahead of the game! Hey... It's not Christmas yet, so I must be early, right?!

I had a little crafty time the other day and had initially planned to play with the box full of goodies from the Holiday catalog.  However, as I looked through my Pinterest board, I found the sweetest quilt-like card and had to make a few.  I had originally pinned this about two years ago and am finally getting around to making it!  You can see the original, made by Sandy, here.  I changed mine up just a little bit, but the overall design is the same.


I scraped together enough scraps from my almost depleted Ski Slope dsp.  There is such a small amount left that I'm feeling this pulling challenge to finish it off this year.  We'll see how that goes!  I used the triangle shape on the banner punch to make my 'quilt' pieces and then glued them to a piece of copy paper.  Then I trimmed the paper and ran it through the square lattice e.f..  The white background was embossed with the snow burst e.f.  I used Teeny Tiny Wishes for the Merry Christmas and Deck the Halls is from the new Happy Scenes.  A little distressing with chocolate chip ink and a few candy dots and we're done!

I am hoping to back here soon with more Christmas cards and maybe even a scrapbook page or two.  Wish me luck and have a fantastic day!  Thanks so much for visiting!!

Monday, September 7, 2015

You're in my thoughts and the back to school time warp...

I can not believe how long it has been since I've last posted or visited anyone!  To be quite honest, there hasn't been a lot of craftiness happening here lately, but I did make a card for a special friend who is going through a bit of a struggle right now.   I managed to squeeze a lot of positive vibes and prayers into this card as I colored it so I'm hoping it will bring health and happiness to her!


This was the first time I inked up Best Thoughts and I just love the beautiful flower and butterfly images in this set.  I used my blender pen and ink pads to color the flower, markers on the butterfly, and pastels on the background.  It was very calming to sit and color once again and I'm hoping to have more free time in the near future to do it again!!

I have decided that there is some sort of mystical vortex that appears with the onset of my kids and I returning to school.  It doesn't seem to affect everything, only the amount of time that was readily available before.  I wake up with plans to accomplish a list of things and then relax before bedtime and the next thing I know it's almost midnight and I'm washing and drying PE clothes that are needed for the next day, paying a bill that should have been mailed two days ago, or some other important detail that has to be handled before morning.  Needless to say, my relaxing time before going to bed is completely nonexistent and I haven't even thought about being creative...

On a more positive and hopeful note, I did recently receive  my preorder for the holiday catalog and OH MY GOODNESS is it awesome?!  I have lots of creative ideas going and will be sharing some of them soon (if I can manage to break the vortex's hold!).  If you would like a peek at the catalog, you can go here to view an online version or message me and I will send you a paper copy to enjoy.

Thanks so much for stopping by and I hope to return the favor soon!  Have a wonderful week!!


Sunday, August 16, 2015

Anything But a Card Challenge #50-Celebrate!

Hello! I'm so glad you came by to visit today!  My post is filled with mixed emotions as I am sharing my creation for our very final challenge at Anything But a Card.  I have loved being a member of this wonderful team of artists from the very beginning.  I still remember the surge of excitement I had when Carla (the original creator) asked me to be a part of the team! Over the years, I have seen so many amazing creations and 'met' so many talented people.  Our team also changed during those years, and Susan has been such an awesome leader.  She keeps us on track, and let me tell you that's not easy with a group of creative minds going in so many directions!!  While I am sad to see the challenges go, I'm thankful that it's happening at a time when I could actually use the break to focus on other things.  It has been a wonderful ride and I wouldn't have changed a thing!

Enough of my personal monologue!  Our final challenge is Celebrate and we are asking you to share any non-card creation with us that fits this theme!  You could do holidays, special occasions, or just about anything that shows how you celebrate!

My project is a gift box to hold note cards and while it may not look a lot like celebrating, it is a gift for my mom's 80th birthday and that is definitely worth celebrating!


The box is actually pretty simple to create and it's especially easy if you have really pretty paper to start with!  I cut a 12x12 piece of DCWV royal garden paper to 8 1/2 x 11.  The 8 1/2 side is scored at 1" and 7 1/2".  Then I turned the paper and scored at 2", 3", 7 1/2" and 8 1/2". Once all of the scored lines had been folded, I cut in at the 1" line on all four score lines.  Finally, I attached the flaps with sticky strip leaving the top flap loose so you can get into the box!  Because the paper was so pretty, I just added a little layered label, a gold ribbon, and called it done!


In this photo you can see the open flap and a peek at the note cards inside.  These were simply more papers from this stack that I cut into 4 1/4 x 11 and scored at 5 1/2 to make the cards.  The papers are so beautiful that I didn't even embellish them-just left them as simple blank cards for my mom to fill out as she wishes.


This is the back of the gift box and you can really see the wonderful print of the paper.  I attached the gold ribbon on this side so it would stay with the box without being in the way.

I hope you were inspired to create your own gift box for your next celebration, and we would be thrilled if you would join us for our last challenge!  Thanks so much for visiting!

Wednesday, July 29, 2015

An Elegant Occasion

Hello! I am so glad you stopped by to visit! Summer break is coming to an end and I'm bouncing between emotions of happiness to be going back to work and getting a paycheck, frustration that once again my 'to do' list was longer than my summer, and sadness that my full days with my girls are coming to an end.  Fortunately, this week will be less hectic than some and maybe, just maybe we'll squeeze a little day tripping in there!

About a month ago, my niece was married and I made the wedding thank yous for them.  I'm pretty sure it's safe to post  a photo of one now that they've been sent out.


She wanted something simple, but elegant, so I used the retired elegant lines embossing folder on some whisper white cardstock.  I added some silver dazzling details, the sentiment in wisteria wonder, and attached all of that to a wisteria wonder base.  I think they turned out very pretty and elegant!

Even though the wedding day was a bit rainy, it was a beautiful occasion and we had a great time celebrating with the happy couple. And while I was so happy to be able to help them out by making the thank yous, I am even more relieved that they were completed on time for the big day!!

Thanks so much for taking the time to visit my blog today and I hope you have a fantastically creative week!

Card Recipe: Paper-wisteria wonder, whisper white, Ink-wisteria wonder, Stamp Set-Regarding Dahlias (sentiment), Accessories-elegant lines ef, silver dazzling details

Friday, July 24, 2015

Flashback Friday-Switching gears

Hello!I'm so glad you stopped by today!  It has been incredibly hot and humid lately, so I have been hiding indoors and started my Christmas cards.  We went from rainforest monsoon season to the dry season in one week.  We have a saying in Indiana (or anywhere in the Midwest for that matter!), if you don't like the weather just wait a minute...  This summer started unusually mild and extremely wet, so when we got our normal hot and humid it was quite an adjustment!

After quite a few birthday cards, I am switching over to Christmas.  I only have two in my stash and will need a lot more in a few months, so I figured I better get busy.  You will probably recognize this layout as the same that I used for my manly birthday cards.  It's perfect for using smaller pieces of dsp that aren't quite big enough for a card front or photo mat.  My package of Merry Moments dsp is quite a bit smaller now-no more full sheets!


When I went outside to take pictures of my cards, I had an 'assistant'.  The calico kitten who decided to adopt us about a month ago really wanted to help with my photo shoot!  Little stinker wouldn't stay off of the patio table!


Here is another photo of Miss Cali and Athos (one of our other kittens) in the grass.  Notice the mess of a yard needing to be raked!  So hard to keep it nice when there's so much rain...


Thanks so much for visiting and have a great day!  I'm staying inside where it's nice and cool!

Card Recipes: Paper-chocolate chip, garden green, real red, very vanilla, Merry Moments dsp (ret), Ink-chocolate chip, Stamp Set-Curly Cute (ret)

Sunday, July 19, 2015

Anything But a Card Challenge 49- Anything Goes!!

Hello! I'm so glad you stopped by to visit today!  This month Anything But a Card Challenges has an open theme, so that means ANYTHING GOES! Well, almost anything-no cards please!!

I was in the mood for something inky and messy this time and my quotes journal was the perfect place to do it.  In my mind, I saw all of these muddy, grungy browns working together and while I had a momentary thought of chocolate, it was quickly replaced with coffee.  So I pulled out all of my browns and started smearing and sponging.  We have a small pickers style store in the town next to us and I found some wonderfully used office stamps one day.  You can see the 'special delivery' made it to this page.  I wanted something to represent coffee mug rings and a quick trip to my recycling bags gave me a milk jug cap. Perfect!


I've had the 'two cup day' sentiment for quite a while and thought it would go well with this super caffeinated page, so it finally saw some ink.  I also used the stamp set Perfect Blend (was so super bummed when this hit the retired list...) to make my cups and the rule the world sentiment.  There was this 'hole' in the top right corner of the page.  Hole is in accents because there was so much ink on this page it wasn't really a blank space, but seemed like it needed something more.  I found an old enamel sticker that would work, but when I put it on the page it was too shiny for such a earthy page.  So I pulled out the rock candy crackle paint and aged it a little bit.  Now there's another completed page in my journal, one that shares a bit about my favorite drink!

I truly hope you have been inspired to create something and share it with us!  We would love to see what you've been up to!  Thanks so much again, for visiting!  Have a marvelous week!

Monday, July 13, 2015

The last of the birthday cards

Yes, you read correctly, this should be the last of the birthday cards for a little while.  Now I need to focus on scrapbooking and Christmas cards! It's a never ending cycle, but someone's gotta do it... lol!

I needed several guy cards and the retired Well Worn dsp tends to be my 'go to' paper for this.  I'm not sure what I will do when it's all gone!


I found a similar card here and only slightly modified Paula's design.  I liked the simplicity of the design, yet there are a lot of layers on this.  The original actually had 7 layers, but I didn't want my cards to become too heavy. I hate paying extra postage!  I adjusted the design by making the dsp layer into split pieces.  This eliminated the need for another layer of the blue cardstock on top of the dsp.  My final layer count was 5 layers, which is still quite a bit for me!  I must have been channeling Kelly at Sandcastle Stamper!! She is the queen of many layers and her cards always look fabulous!!

We just got back home last evening from another successful Kids Camp.  My laundry hampers are overflowing and the grass looks like it could be cut and baled instead of mowed...  Probably not much crafting going on here for a few days, but I'll be back on Sunday with my DT post for Anything But a Card.  

Thanks so much for stopping by and I hope you have a marvelous week!!

Card Recipe: Paper-well worn dsp, early espresso, not quite navy, soft suede, cajun craze, river rock, Ink-crumb cake (distressing), early espresso, Stamp Set-Apothecary Art

Thursday, July 9, 2015

and another one's down...

Another one bites the dust!  Yep, I am still on my Pinterest card kick, and I'm happy to say that I've made another card based off of a pin!  Now, DH can let me waste my time on the computer knowing that all of that pinning and blogging is being put to use!  I am as likely to convince him of this truth as the one about making my own cards will save us money since we won't have to buy cards! Tee! Hee!  Even I can't keep a straight face on that one!  But enough of my rambling, on to my card!


I took inspiration from Lydia's card, and the only
change I made was using pastels to color the
flowers instead of re-inkers.

It was quite therapeutic to color all of those leaves and flowers-something I needed after a week of purging the closets and dressers...  I really like the soft effect for an anniversary card.

I had a bit of a reality check this morning as DD#2 mentioned that it is less than a month before school starts.  What?!  I am really longing for the good ol' days when we didn't start school til after Labor day and were finished by Memorial day...  Quite honestly, I don't think today's kids are that much smarter!  

My posting may be a bit patchy since there are still many things I need to finish before I head back to work.  There is a light at the end of my tunnel of cleaning, and I really want to reach it before all of my duties kick back into play.  Wish me luck and have a fantastic rest of the week!!

Saturday, July 4, 2015

Mission Impossible!

Hello and happy 4th to all of my fellow Americans! I am so glad you came by to visit today!  I actually have something crafty to share with you, and it's not even a DT project!!

I had decided at the beginning of this summer that our home needed a major clean out.  We are hoping to build in the near future and I thought that not only would it get rid of things we don't need, but it would also make moving a little easier.  I should have called this Mission Impossible...  I have lost count of the number of trips we have made to local charities donating what was still usable, and don't get me started on the things that were simply tossed.  You would think that my home would be barren at this point, but I keep finding more and more things.  This is the main reason my poor blog has been less than busy.  But now I'm finding that I really need that creative therapy more than ever!!

I have also been on a card making mission this summer.  Seems someone has infiltrated my home and confiscated my stash of birthday cards (no, I didn't throw those out).  Either that or I actually had a lot less created than I initially thought...

Normally, I will look at the SU catalog, or some of my other cards for inspiration, but since I spend a lot of time on Pinterest and blogging, I thought I needed to use some ideas from these places to warrant all of that time!  If you would like to see any of the fun things I've pinned you can click here.  This will take you to my Pinterest boards page.  Both of my cards from today were designs borrowed from Pinterest.


You can see the inspiration card here.
I pretty much CASEd this one!

While I couldn't find the direct link to this card,
if you click here, it will take you to the person who 
created it originally.

I have to share my luck on the balloon die I used to make the second card.  Last month, I had my new SU order ready to enter and was excited to be buying the balloon framelits so I could start putting some cute balloons on my cards and scrapbook layouts.  The girls and I had stopped in our local Good Will store to check out the book selection for our summer reading pleasure.  I always browse the whole store because you never know what you might find.  Imagine my joy when I found a basket full of sizzix dies!  I ended up buying three dies-a wood sign, a picket fence, and balloons.  How much did I pay for these? $4 for all three!!!!!  Needless to say, I removed the framelits from my order since I was pretty sure that I could get the other die to work pretty much the same way.

I am really trying to use my scraps and retired supplies more in an effort to decrease the mountains, and both cards used the retired Summer Smooches dsp, and the balloons are all from my scrap bucket.  Even though you can't really tell that anything is gone, it makes me feel better that they've been put to good use!

Well, DH has built a campfire and the family is calling me to join them!  Thanks so much for stopping by and have a wonderful day!


Sunday, June 28, 2015

I've been cheating...

Have you ever put together a few cards that were SO simple that you felt like you were cheating?  Well, I have always heard of people doing 5 minute and 10 minute cards, but put them in the same category with unicorns, comfortable dress shoes, and tasty calorie-free treats!  So I was a little shocked when I managed to knock out not one, but FOUR cards in about ten minutes-and most of that time was picking out my papers...  CRAZY!!!!

I also have a confession to make.  I know that Project Life is huge right now and there are so many people doing amazing things with these kits, but I cannot get into it!  I have tried several times to create those 'in a few minutes' scrapbook pages and spent over an hour trying to decide just how to make things work for me.  Since Stampin' UP is offering many stamps, kits, and supplies in the new catalog, I felt like I needed to give it another try.  I am still not sold on the scrapbooking part (I really like my big blank canvas approach), but I can see the benefit of using the kits for cards.

I used the retired Everyday Adventure kit to make my super simple cards.  Many of the papers have blank spaces for titles or writing.  This makes stamping really easy! Then all I had to do was trim the 4x6 pieces, attach them to my card bases, and add a little embellishing (or not!).


This card used another piece of pattern paper, 
two strips of washi, and I even used the piece
I cut off of the 4x6! No waste at all!!

                                                                                                                                                                     
I added a puffy 'doodad' sticker to this one.


The strip cut from the second card found its 
way to the bottom of this card.

 !
And this one doesn't have a single thing
added to it, other than the sentiment!

I'm still in a minor state of shock over how quick this went and how much I liked the finished cards.  Nice and flat for mailing too!  No lumpy cards here!!  The papers in this kit worked so well for the masculine style I was needing, and I'm sure the guys won't miss the ribbons and embellishments!
While I'm sure I won't give up my more traditional card making, it is nice to know that if it's crunch time, I can make a card (or four) in under ten minutes!

It's another busy day for our family tomorrow and this Mama is getting sleepy so it's off to bed with me!  Thanks so much for stopping by!  It makes my day a little brighter knowing that I'm not alone out here!!  Have a fantastic week!


Sunday, June 21, 2015

Take a Hike! with Anything But a Card

No, I'm not telling you to get lost (unless you enjoy doing that on a hike!) or anything like that!  I'm sharing my creation for Anything But a Card's challenge 'Out and About'.  We are inviting all of you creative people to share what you love about the outdoors.  It could be celebrating the seasons, nature, your favorite place, vacations, cookouts, or any outdoor activities!  The choices of inspiration are as big as the great outdoors themselves!

My family loves to spend time camping and hiking, so my DT project is a scrapbook page about hiking in one of our favorite places.  We usually hike in the spring or fall when the weather is a little cooler, and the bugs are a little less active.  The photos I scrapped were from the fall, so I chose fall colors for my page.


I have not scrapped in a while and it took me a little while to get my muse in gear!  It took longer to pick out the papers than it did to put the thing together!!

I think most of the page is pretty easy to figure out.  The only thing that was a little more involved was the red leaf.  I used the autumn accents die to cut the leaf, creased the cut leaf in half and ran it through the woodgrain embossing folder.  I inked up all of the edges with some crumb cake ink to make it more earthy!  Easy peasy!

I hope you will make time to share a special outdoorsy project with us this week!  Thanks so much for stopping by!

Thursday, June 11, 2015

Anything But a Card-Out and About

Have you ever spent days cleaning and organizing and just felt like you supplies were crying out to you?  This has been my reality for the past week, especially when I cleaned up my crafting space!  I am suffering from creativity withdrawal...  Very soon, I hope, I will once again be back at my table!

While I don't have anything that I've created to share with you, I do want to share our latest challenge at ABAC.  Maybe you will find some time to join in the fun!

The new Challenge... "Out and About". For Anything But a Card Challenges No. 48 use the great outdoors as your inspiration to challenge your muse; celebrate nature, your favorite place; World Environment Day June 5th; the seasonal colors at your place; or just having fun outdoors. Summer time is here which is everyone's favorite time of year - time for vacations, camping and cookouts! Use your muse to create whatever our prompt "OUT and ABOUT"inspires you to make {remember no cards}. Now it's time to gather all of your creative goodies to come out and play.

I have lots of ideas running through my head for this one and will be sharing with you on week three!  Hope to see you (or at least your creation) there!

Friday, June 5, 2015

The last of the graduation cards

I think this year just might be the record breaking year for graduation parties!  Guess that's what happens when your oldest is in high school!  Because of the number of celebrations, I decided to make a few multiples instead of many individual cards (time crunch, anyone?!).  I did manage to personalize them a bit with school colors and changing the background pattern paper to fit the recipient's interests when I could.

Both of the cards shown are the same basic design and I also made a few more that used this same style.  I decided to show two of them to share how to make a unique card without changing the layout.  The first one used book print paper paired with the spiral punch for a general academic feel.  On the second card, I swapped out the words for music note paper.  This made an easy, but personalized touch for the musical graduates.  Even swapping out paper and ink colors can give a more individualized addition.


Of course, I'm sure most of the grads were more pleased with what was on the inside of the cards, but it made me feel a little better about giving something personal to go with the cash and gift cards!

I have been quite busy cleaning and organizing this past week.  My goal is to purge/clean out the entire house by the end of June.  Wish me luck!!  We are hoping to have some solid plans in place very soon to finally dig our basement and prepare for our new home!  I can't really call it 'moving' since our new house will still be on the same property that we are currently living, but the less things I have to relocate, the better!

Well, I better get back to work, but I will be back soon to share some new creations!  Thanks so much for stopping by and have a wonderful day!
  

Tuesday, May 26, 2015

A little Word Play to start my summer

Hello! I am so very happy to announce that my summer vacation has officially begun!  We had our final day lunch meeting today and now I am free for a few months!  We still have softball sectionals going on, but other than that my days are filled with laundry, weeding, and other very neglected chores!

Of course, this also gives me a little play time as well so I hope to be posting and visiting more often!  Today's card was made last week, but I'm just now getting around to posting it.  This is a graduation card for a special young lady.  Not only is she family (my cousin's daughter), but she was also one of my preschool students a few years ago (must be super smart to graduate so early! wink!).  I made her card in her school colors and thought this sentiment from Word Play fit perfectly.


It was so much fun to pull out my supplies and make individual cards again since I haven't done this for a while!  I'm still a little behind on my birthday card making so that will probably be next on my 'to do' list.  Well, at least the one that I actually want to work on completing- the housework one? not so much...

I have a few more graduation cards to share with you but will save them for another day!  Until then, I hope you manage to find some time this week to make something fun!

Card Recipe: Paper-night of navy, whisper white, cherry cobbler, Ink-night of navy, cherry cobbler, Accessories-perfect polka dots ef, cherry cobbler seam binding

Sunday, May 17, 2015

Anything But a Card- Inspired by a Master

Hello! I am so glad you stopped by my blog today! This month, Anything But a Card Challenges has a fantastic challenge (well, every month is fantastic, but I REALLY like this one).  We are encouraging you to choose someone you admire artistically and create something based on that inspiration.  This could be one of the famous masters or someone amazing that may not be world renown. 

I knew immediately who my inspiration would be.  When I was in college, I took a few art history classes and absolutely fell in love with Monet.  I was even fortunate enough to see the traveling Monet exhibit at the Art Institute of Chicago when I was fresh out of college.  There is just something so amazing about the blurred lines and gorgeous blends of color in all of his creations.  The most difficult part of this challenge was deciding which work to use as my inspiration piece.  I finally chose his Iris paintings, mainly because the irises are currently blooming in our yard!

Here is one of the Master's Iris paintings...

Irises

This is actually an oil painting and my creation is more of a watercolor, but I think the inspiration still shows in my ATC.  I also did not have an actual iris stamp so I have a 'sorta kinda' purple iris thing in my garden.  I'm sure Monet wouldn't mind my creative twist at all!


I used soft sky, pool party, and marina mist inks with an aqua painter to make the background.  The flower was stamped in wild wasabi and elegant eggplant inks and then lightly brushed with the aqua painter.  It was a lot of fun to make my version of a Monet painting, and I really hope you will decide to join us and share your favorite!


Saturday, May 16, 2015

Almost there...

It has been incredibly busy here, but freedom is just around the corner!  Between tennis, softball, choir, school, and home, spring is always a busy time of year.  Add to that some crafting projects for the softball team, and thank yous for my niece's wedding, and it gets borderline crazy!  However, the thank yous are finished, the last of the softball projects are almost ready, and there are only five, count them, five glorious days of school left!  I really cannot wait for the first day of summer break!

As I mentioned above, my niece (actually my husband's niece, but we're all family here!) was recently married.  I helped a little with her shower decorations and offered to make the thank yous for her wedding.  It was a bit of an assembly line production since she wanted 100 of them, but I managed to get them all completed and boxed on time to give them to her at the wedding.  I'm not going to share a photo of the thank you just yet, as a courtesy to the bride and groom, but I do have the wedding card I made for their special day.

This was incredibly easy and I almost feel guilty claiming I made it!  I used a piece of wisteria wonder cardstock and embossed it with a heart folder, then I simply added a premade wedding embellishment that was in my stash.  Easy peasy!!


Well, it's another crazy day for me so I gotta get going! Thanks so much for stopping by today!

Friday, April 24, 2015

Play Ball!

Hi! Spring is here and that means sports time at our house.  So in honor of our crazy schedule makin', dirty laundry creatin', Mom a taxi driver makin' sports, I have two scrapbook pages that really don't have anything to do with what is currently happening in our house! Ha! Gotcha!!

As you look at my pages I can hear you arguing with me that these are sports pages... BUT they aren't SPRING sport pages! What's that you say? Softball IS a spring sport?! Well...I can't argue that because DD#1's contribution to the dirty laundry is definitely softball stuff, but these pages are from DD#2's summer softball league!  See how tricky I am...

I have had these ball pages in my stash for a loooooooong time and I felt a little celebration building up inside when I finally got some photos on them!  One of the great things about pages like this is that the background is interesting enough that you really do not need to do a lot of embellishing-already busy enough!  So I ran a row of photos across the middle and used some twine to draw attention to them, then all I needed to do was add a little journaling block to the bottom.  Easy Peasy! 


The second page took only a little more effort since I stamped and cut the softballs and letters.  Two more pages for my albums! Woo! Hoo!


Thanks so much for stopping by today!  We have about a month left in our school year and I for one am ready for a less hectic schedule! More creating time for Mama!  Have a fantastic day and whatever the season in your part of the world, enjoy it!

Page Recipe: paper- bases from stash, crumb cake, green from stash, yellow from stash, ink-real red, basic black, stamp-softball (not sure at the moment of the maker), accessories-twine from stash, little letters thinlits

Sunday, April 19, 2015

Anything But a Card Challenge 46 Fool's Gold

Well, hello! I am so glad you stopped by! Today I am sharing my DT creation for ABAC.  This month's challenge is Fool's Gold and we are challenging you to pull out all of the wonderful golden, gilded goodies that you have and make something wonderful to share with us!  I really hope you will be able to join us!

I have to admit that I don't use a lot of gold in my creating. I'm more partial to silver personally, but I did have some wonderful gold foil paper in my supplies and I thought it might be fun to create an ATC using this.


I ran the foil paper through an embossing folder and then patted it on top of an early espresso ink pad to give it an aged appearance.  I didn't want to cover up the pretty embossing, so I kept the embellishing pretty simple and uncluttered.

I want to apologize to my regular blogging friends for my lack of visiting.  Things have been pretty chaotic around here and I am counting the days til summer vacation!  It seems like there are less hours in the day lately...  I promise I will resume my regular posting and visiting in a few more weeks!

Thanks again for stopping by and I hope you enjoyed my golden creation!  Have a fantastic week!

Friday, April 17, 2015

Flashback Scrapbook Friday

Hello and TGIF!  I have spring fever so bad and it is killing me to be inside at work all week where there are so many other things I could be doing!  Like updating my blog!!!

I still have a few photos of scrapbook pages from my crop that I have not shared and I thought that since the papers are old and now the pictures are a little bit old, we'll just call it a Flashback!

Today's layouts are not anything fancy and were completed rather quickly once I knew what I wanted. 

Have I mentioned how much I LOVE the tag 
topper punches???  Here's another one on this page!


I pulled out the pennant punch to make the title 
for this page.  I just had to have this paper long
 ago and then never used it until now!

Well, that about wraps it up for me!  I hope you have a wonderful day and that you don't spend all of it cooped up inside working-yuck!  Thanks so much for visiting!

Page Recipes: paper-bases from stash, whisper white, green from stash, ink-strawberry slush, basic black, accessories-scallop tag topper punch, pennant punch, bakers twine from stash, whisper white bakers twine

Wednesday, April 8, 2015

How does this happen?!

Hello! Don't mind the post title; I'm just trying to solve one of the earth's mysteries...  Not the meaning of life or why are we here, but how can I use so many of my supplies and still have a mountain of things there when I'm done?!  I would pack my bags and seek enlightenment elsewhere, but I'm pretty sure this is what is referred to as a 'first world problem'. wink!

But seriously, I packed my supplies for the crop I attended recently and was thinking  that this is such a great way to use up some of my things.  If I don't have the entire stash at my fingertips, I have to use what is there.  Somehow, even though I used what I brought, I still ended up bringing a lot of it back! Now, granted there were attendance prizes, a gently used sale, and a silent auction... Hmmm...this might have something to do with my mystery!  I can say that I did use quite a few of my new goodies immediately which worked out really well when I realized I did not bring nearly enough embellishments. OK! Enough of my pseudo-problems and on with the pages!


Again, super simple and featuring another tag topper!
No new goodies on this page!


I used three of my freebie flowers that were in my 
goody bag at the table. Great to have something
that works so well with what I'm making!  Don't you
just love DD's face in the middle photo?!

I hope that my super simple scrapbooking is encouraging you to do a bit more creating yourself.  And if you ever find out why a crafter with waaaay too many supplies continues to buy more as she complains about too much stuff-then you have REALLY solved a mystery!  Thanks so much for stopping by!

Page Recipes: paper-bases from stash, whisper white, ink-tuxedo black, stamp-just journaling, accessories-pretty new flowers from goody bag, angled tag topper punch, bakers twine and burlap ribbon from stash  

Friday, April 3, 2015

A special helper makes everything fun!

Hello! I am so glad you stopped by today!  If you have been following my blog recently, you know that I attended a crop last week and worked on lots of scrapbook pages.  So now I actually have pages to share with you!

My DD#1 likes to make cards and went along with me.  She also took her bucket for softball that she has to decorate and return to be used for storing her gear.  When we arrived at the crop, one of my former preschoolers helped us carry things inside.  His grandma organized the crop and he was there 'helping out' (He informed me that really he was 'in charge' but it was a secret!).  We had a great time catching up and he was quite impressed that DD1 was decorating a bucket.  His face lit up when she asked if he could help her.  They worked together for about 15 minutes, perfectly placing the stickers and decorations.  It was so much fun watching the two of them together, and he spent a big part of his time visiting with us and even made a few pictures using some goodies we gave him.  It was a great reminder that when we share what we love to do with others, we not only enrich their lives, but bring happiness to our own.

Here is the photo of the busy bees working on the bucket.  I blurred the faces as a courtesy to the others there.  I think she just might have the most blinged out bucket in the dugout!


I also managed to get a little something accomplished!  I completed several of DD#2's scouting and softball pages.  I still have a ton to do, but at least the albums have a few more pages in them!


I have found that I have really adopted a less is more style to scrapbooking.  I absolutely love the beautiful vintage and full of embellishment pages that I see others creating, but I just keep thinking that for me less is more.  I have decided that this specific page is going to get a title, but I also knew that as busy as I've been lately that if it didn't get on here as is, it may never appear!  I'm not going to give any instructions for this page-pretty self explanatory...

I am so glad that you took the time to visit.  I know that life can get super busy and it means so much that you take time to see what is going on here!  Have a wonderful day!!

Page Recipe: paper-base from stash, whisper white, ink-tuxedo black, stamp-Just Journaling, accessories-paper flowers from Audrey, white brads from stash

Sunday, March 29, 2015

Another Fifth Sunday at Anything But a Card Challenges

Hello!  In case you had not noticed, this month has 5 Sundays in it.  That means there is a mini challenge going on this week at Anything But a Card Challenges to create something with five.  That's it; no other requirements (other than the whole card thing...) needed.  It can be the number five, five items- the sky's the limit!

I went to a Relay For Life cancer fundraiser crop this weekend and had the most wonderful time with my oldest DD and many incredibly talented ladies.  Lots of food, lots of laughs, and lots of creating for a very good cause.  My five could also easily be the five pounds I probably gained from all of the yummy snacks and meals, but instead I'll share a photo of my five flowers I made on this scrapbook page.  You really don't want to see me with my extra five pounds!


I used the Boho Blossom punch to make the flowers, inked the edges and put them together with some very old green brads I had in my stash.  That's one of the good things about crops-they make you use what you brought!

I have also decided I love my tag topper punches! These are so awesome for dressing up journaling!  I was a little proud that when we left the crop, I had scrapped all of the photos I had brought with me.  Feels pretty good to be putting a few more pages in my girls' albums!

I will be back soon with more layouts from my scrapbooking day.  Have a wonderful week and thanks so much for stopping by for a visit!

Page Recipe: paper-base from stash, whisper white, ink-strawberry slush, accessories-boho blossom punch, scallop tag topper punch, green brads, twine from stash

Friday, March 27, 2015

Sure Signs of Spring

There are so many heralds of spring-crocus and daffodils, robins returning, grass greening, buds forming on trees, the ping of a ball hitting a bat... What?! That doesn't happen everywhere???  In our home, the true sign of the arrival of spring is muddy cleats and softball pants!  This sign shows up sometimes before the first flowers!!

I have once again been neglecting my poor blog for other priorities, like playing taxi driver and running a full service sports laundromat...  I did however manage to combine one of our favorite spring sports with some crafting time recently.  I volunteered to create this year's bulletin board located at our school's softball field.  While these are not the most 'crafty' things I have made, I did color and bling up the images that I printed!


This image was already created, but I colored the letters 
with red and added dazzling details to the word 
'diamonds' 

I used a digital softball image, turning the color from 
black to red, then added the Bible verse.  It was printed 
onto softball colored cardstock.

This was a digital image that I simply printed.

I created the inspiring sentiment in a word document,
then added some sparkly softball stickers for good 
measure!

All of the items were mounted on basic black or real red cardstock.  I also made some smaller softballs using a stamp, real red ink, and the softball colored paper.  Each player will have her name and number on a softball.

Well, I know it's not super creative, but I thought I would share just what I had been up to!  I also have another project to share but have to wait a little while for that.  I am also heading out to a crop tomorrow, so there should be a bit more coming up shortly!  Thanks so much for stopping by and I hope you have an incredibly creative weekend!

Thursday, March 19, 2015

Bunny Butts, Anyone?

Hello! So very happy you stopped by for a visit! Today I have a cute little treat that is super easy to make and perfect for Easter.  This was my 'make and take' project for a recent fundraiser at my school.  My girls have affectionately named these Bunny Butts. 


If you need something that is easily reproduced (like bunnies...), this is a terrific option.  I punched out all of the pieces for 30 of these while watching tv one evening.  They are even easier to put together.  For each Bunny you need a 2 1/2" circle with a 1 3/4" circle punched out, a complete 2 1/2" circle, and two small ovals.  I also used a circle treat cup ($2.95 for 12) and a 1" white pompom.  The snack size bags of pastel m&ms fit perfectly inside the cups!

We had a lot of fun making these at the Ladies Day Out and I think they could be cute table setting decorations for Easter as well.  I have been playing around with a lot of my new to me supplies and will have quite a bit to share with you soon!  Spring Break is almost here and I have big plans to get a lot of scrapbooking completed and lots of other creative things accomplished too!

Well, I better get hopping back to work! Thanks so much for stopping by!

Project Recipe: Paper-whisper white, Accessories-2 1/2" and 1 3/4" circle punches, small oval punch, circle treat cups, white pompoms

Sunday, March 15, 2015

Anything But a Card Challenge 45-Green with Envy

Hello and happy Ides of March!! " Et tu, Brute?" (My high school lit teacher would be so proud that I remembered this!) It is time for Week 3 of the Green with Envy challenge at Anything But a Card.    The team has shared some wonderful versions of green and envy, and we would love to see what makes you go green!  I have to say that this challenge stretched my mind creatively (happens quite a bit with these amazing ladies!) since I really couldn't come up with anything for 'envy' and while I like green, it's not my 'go to' color.  So I went to my trusty Pinterest search box to see if something there would inspire me.

If you want to be completely overwhelmed and wowed at the same time, try typing in 'green art' in the Pinterest search box!  There were a lot of amazing creations, but this one really caught my eye!


It's made from glass bottle bottoms!! Isn't it fantastic?!  Now, I am nowhere near skilled in glasswork.  I would either shatter the pieces or slice off a finger in the process!  I did like all of the varied shades of green and the round shapes.  I also knew I had a lot of green scraps that could create a similar design.  I decided to make a scrapbook page, using the greens to make a background pattern.  I set out with all of my circle and scallop punches and a bunch of green papers. *Bragging moment- I did not cut any whole sheets of paper for my page!  Everything was scraps, except for the green base!*

After punching a lot of shapes, I started to lay out my pattern, and this is where it all went downhill fast.  I was totally stressed out over their placement.  First, too many of the same size, then the same color, then colors that didn't look great together.  Grr...  So I took a break, made lunch, and did a load of laundry, and during these tedious jobs a thought struck me.  This is supposed to be fun and I'm not having fun.  I'm choosing laundry over creating...  So I went back to the pile of circles and reminded myself that art is process not product.  Rather than attempting to lay out the entire page, I started in a corner and worked my way out.  Interestingly enough, it became easier once I was committed to complete what was already glued down!


To add interest, some of my circles went off the page and were trimmed.  I then reused the cut off pieces to fill in other edges.  Truly a 'scrap'py page!  The photo I added was from a craft day that my daughter's Girl Scout troop sponsored, so all of the green ended up being quite appropriate for the scouting page.

I hope you will join us with your green with envy creation!  We would love to see what you do with the challenge!  It's a great way to celebrate St. Patrick's day too!

Page Recipe: papers of almost every shade and pattern of green, various circle and scallop circle punches, perfect polka dots embossing folder


Tuesday, March 10, 2015

Happy Easter Bunny

Hello! I am so glad you stopped by today!  I have a fun little card to share with you that I made during one of our most recent snow days.  I am not normally prone to purchasing Easter stamps since they aren't as versatile for other purposes, but the Happy Easter Bunny stamp from the Occasions catalog was just too cute!  Plus, it has absolutely nothing to do with snow and freezing cold weather, so it was a pleasant change from my current view...

I paired the sweet bunny with the Painted Blooms DSP (also from Occasions) because this spotty paper reminded me of dyed eggs.  It was fun to color the image as I watched movies with my girls.


When I finished putting all of the layers together, the card looked like it still needed something.  So I pulled out some retired wild wasabi ribbon to make a bow.  I really wish I had moved the oval up a little so the bow would be under the image, but it was already glued down and I didn't want to tear up the card.  

I can't believe that in a few short weeks, Easter will be here!  Where has the time gone?! Not that I am complaining that spring is on its way!!!!! Bring it on!  I am just hoping that I will be ready when the time comes!  

Thanks so much for visiting today and have a marvelous day!

Card Recipe: Paper-daffodil delight, whisper white, Painted Blooms DSP, Ink-memento tuxedo black, wild wasabi, rose red, blackberry bliss, soft sky, blushing bride, pacific point, Stamp Set-Happy Easter Bunny, Accessories-oval framelits, wild wasabi stitched ribbon